The Eleventh Tutorial of Christmas
 The perfect size to hold books and small toys!
 Finished size: 8 inches wide x 10 inches tall
Materials Needed:
1/2 Yard fabric for outer, and 1/2 yard fabric for inside lining
Iron-on interfacing
1 inch Velcro
Ribbon or Ric-Rac trim
Sewing Machine
Pins
Scissors
Matching thread
Step 1: Cut out the pieces.
From outer fabric cut the following:
Outside of Tote: 21" x 9" (cut 1)
Handles: 14" x 2 1/2" (cut 2)
Closure: 3" x 7" (cut 1)
Pocket: 8" x 9" (cut 1)
From lining fabric cut the following:
Tote Lining: 21" x 9" (cut 1)
Handles: 14" x 2 1/2" (cut 2)
Closure: 3" x 7" (cut 1)
Handles: 14" x 2 1/2" (cut 2)
Closure: 3" x 7" (cut 1)
From iron-on interfacing cut the following:
Tote Lining: 21" x 9" (cut 1)
Handles: 14" x 2 1/2" (cut 2)
Closure: 3" x 7" (cut 1)
Step 2: Iron the interfacing to each lining piece.
Step 3: create the pocket.
Fold the top edge of the 9" side of the pocket down 1/2", and then again 1/2" and sew across.

Cut a 9 1/2 inch piece of ribbon or trim and sew it 1/4" down from the top of the pocket, hiding the seam you just made.
 Zig-zag or serge across the bottom of the pocket.
Press the bottom of the pocket under 1/2" and pin it to the outside of the tote so that the top of the pocket is positioned 3 inches down from the top of the tote. Sew a seam across the bottom of the pocket.
 Step 4: Create the handles and velcro closure.
 Turn the closure right side out and sew a 2 inch piece of velcro on the lining side of the closure.
 Sew a top-stitch around the closure flap.
Place right sides of handles together (1 lining, 1 outer fabric) and sew a 1/2" seam down each long side.
 Turn right side out, iron flat, and sew a top stitch along each long side.
 Step 5: sew the lining.
 Step 4: Create the handles and velcro closure.
Place right sides of closure together (1 lining and one outer fabric) and sew a 1/2" seam around the outside edge, leaving one end open, and curving the other as shown below.
Cut the excess off the curve, and clip the fabric every 1/4 inch along the curve.
Cut the excess off the curve, and clip the fabric every 1/4 inch along the curve.
 Turn the closure right side out and sew a 2 inch piece of velcro on the lining side of the closure.
  Sew a top-stitch around the closure flap.
Place right sides of handles together (1 lining, 1 outer fabric) and sew a 1/2" seam down each long side.
 Turn right side out, iron flat, and sew a top stitch along each long side.
 Step 5: sew the lining.
Fold lining in half, and sew a 1/2" seam down each side.
 Step 6: Sew the outside of the tote.
 Sew the reverse side velcro centered on the front of the tote, and 1 1/2" down from the top.
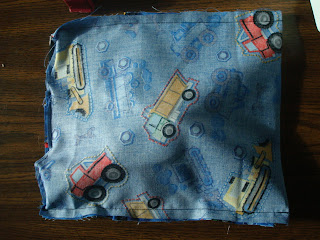
 Fold the tote in half and sew down each side in the same way that you sewed the lining. (keep the handles and closure flap tucked inside, but be careful not to sew over them.)
 Step 7: Sewing in the lining, and finishing the tote.
 Sew a 1/2 inch seam around the top that you just pinned, leaving a 3 inch opening to turn it right side out.
 Step 6: Sew the outside of the tote.
Iron a 2" x 3" piece of interfacing centered on the reverse side of the front (pocket side) of the tote, and 1 inch down from the top.
 Sew the reverse side velcro centered on the front of the tote, and 1 1/2" down from the top.
Pin and sew the handles and velcro closure to the tote with a 1/4" seam. The handles should be set 1 inch away from each edge, and the velcro closure should be centered on the back. (make sure they will be facing the right way once they are sewn on) See picture below.
 Fold the tote in half and sew down each side in the same way that you sewed the lining. (keep the handles and closure flap tucked inside, but be careful not to sew over them.)
 Step 7: Sewing in the lining, and finishing the tote.
Turn the lining right side out (so the interfacing is on the inside) and insert it into the outside of the tote. (the right sides should be facing each other)
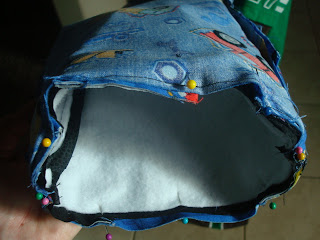
Lining up the side seams, and making sure the handles are straight, pin around the top.
 Sew a 1/2 inch seam around the top that you just pinned, leaving a 3 inch opening to turn it right side out.
 Through the opening, carefully turn the tote right side out.
 Push the lining inside the tote, and sew a top stitch around the top, closing the 3 inch opening.
 Finished!
 Perfect for my little Sunbeam!
 He's so excited to take it to church with his new scriptures!
 This would go great with the travel pillow idea. Fill this with some fun car activities, snacks and toys, and you will make ANY little one's day!
 Push the lining inside the tote, and sew a top stitch around the top, closing the 3 inch opening.
 Finished!
 Perfect for my little Sunbeam!
 He's so excited to take it to church with his new scriptures!
 This would go great with the travel pillow idea. Fill this with some fun car activities, snacks and toys, and you will make ANY little one's day!