
The Fifth Tutorial of Christmas
 If your house is anything like mine, those credit card offers that come in the mail with the little cards that say "your name here" are worth more than a real one! At least to a little kid. Now I have two of them that fight over them (soon to be three)! The biggest issue is that they are always getting lost, so there is always need for about 10 more! I think I finally solved that problem.
  I decided to make them each a wallet that can hold plenty of cards, as well as a drivers license (Which my 3 yr old just decided he really needs), a few coins, dollar bills... basicly a wallet perfect for everything!
 It is incredibly simple if you think about sewing it all together in a bunch of layers... in the right order! :)
ALL SEAMS ARE 1/4" UNLESS OTHERWISE SPECIFIED!
Materials Needed:
1/4 yard each 3 coordinating fabrics (I used canvas for the outside and inside, and cotton print for lining.
Small piece of vinyl (you could even use a package you buy sheets in)
Velcro
Heavy Duty Metal Snap (or you could use velcro)
Scissors
Thread
Sewing Machine
Cut 1 rectangle 4 x 8 1/2" from outer fabric (striped)
Cut 1 rectangle 4 x 8 1/2" from inner fabric (green)
Cut 2 rectangles 4 x 8 1/2" from lining fabric (town road print)

Cut 1 Rectangle 3 1/2 x 8 1/2" from the lining (green) - pocket #1 (long pocket)
Cut 1 rectangle 3 x 4 3/4" from lining (green) - pocket #2
Cut 1 rectangle 2 1/2 x 4 3/4" from lining (green) - pocket #3
Cut 1 rectangle 1 3/4" x 5" from lining (green) - for velcro closure
Cut 1 rectangle 4 1/2" x 3 1/2" from vinyl and trim corners in as shown below. (the top flap part will fold over to hold in the ID.

Cut 1 square 4" x 4" from outer fabric (stripes)
Cut 1 (EACH) rectangle 4 1/2 x 3" from lining AND inner fabric. Trim one long side of each so that it is rounded slightly, as shown below. (all the pocket pieces [pocket square and pocket flap] are shown below)
 You should have all your pieces cut out now!!! :) (finally)
 Zig-Zag or surge around all four sides of pocket square (stripes) and along one side of each of the lining pockets (green) as shown below.
 Placing right sides together, sew around the curved side of the pocket flap, and snip to seam every 1/4". Turn right side out and press.
 Fold down the zig-zaged side of each of the pockets, and one side of the pocket square (stripes) and sew a 1/4 inch hem.
 Mark center of pocket (striped) and pocket flap...
 insert snap, and sew the open side of the flap closed, by tucking in the raw edges 1/4 inch and sewing closed with 1/8 inch top seam.
 Fold velcro closure in half (so it is now 2 1/2" x 1 3/4") and press edges inward 1/4". Sew a top stich close to the edge on both edges. Sew a 1/2" x 3/4" piece of velcro on end.
Side 1 of closure:
 Side 2 of closure:
 Sew coin pocket FLAP to outside (stripes), leaving 3/4" at top. Sew it so that flap will stay open. (this creates a nice finished look when it is snapped shut) (please ignore the fact that my snap is totally messed up. I was in a hurry, and put the wrong pieces together... and then found out that I had used my last one! It is still waiting to be finished right. :)
Sew the pocket under the flap, folding zigzaged edges under 1/4 inch and sewing 1/8 inch seam around 3 sides, leaving the top open.
 Sew velcro closure onto right side of outside. (as shown below) and sew on oposite side of velcro onto the other side. (as shown below)
 Sew Pocket #1 (green 3 1/2" x 8 1/2") onto large lining (green 4" x 8 1/2") piece by sewing a seam exactly down the middle of the two pieces, as shown below.

Sew pocket #2 (green 3" x 4 1/2") on top of pocket #1, on the right side, lining upthe right sides, and hemming the left side of the pocket under 1/4" (this picture is probably just going to confuse you, so if it does look at the next one. I forgot to take a picture of this step until I had both little pockets sewn on, and then I tried to take a picture... only making it worse.... and the picture needs turned 90 degrees to the right)
 Sew on pocket #3 the same way you did pocket #2, folding the left side over 1/4" to hide the raw edge. It should now look like the picture below:
 Placing right sides of outside and inside together, sew around outside edge, using 1/4 inch seam.
 Sew velcro closure onto right side of outside. (as shown below) and sew on oposite side of velcro onto the other side. (as shown below)
 Sew Pocket #1 (green 3 1/2" x 8 1/2") onto large lining (green 4" x 8 1/2") piece by sewing a seam exactly down the middle of the two pieces, as shown below.
 Then sew a horizontal line to keep the cards from getting lost in a bottomless pocket. (use a card to measure how far down to sew - sorry I forgot to measure this step) As shown below:
SEW THE HORIZONTAL LINE ALL THE WAY ACROSS. i DIDN'T DO THIS, AND HAVE A BOTTOMLESS POCKET ON THE LEFT! (AS U CAN SEE BELOW)

Sew pocket #2 (green 3" x 4 1/2") on top of pocket #1, on the right side, lining upthe right sides, and hemming the left side of the pocket under 1/4" (this picture is probably just going to confuse you, so if it does look at the next one. I forgot to take a picture of this step until I had both little pockets sewn on, and then I tried to take a picture... only making it worse.... and the picture needs turned 90 degrees to the right)
Sew another horizontal seam, much like you did on pocket #1, using a card again to measure how deep to make it.
 Sew on pocket #3 the same way you did pocket #2, folding the left side over 1/4" to hide the raw edge. It should now look like the picture below:
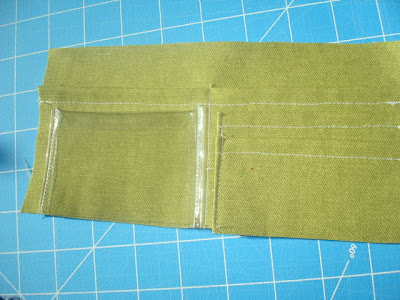
 3 pockets on the right, and 1 on the left.

Sew the vinyl ID pocket on the left side of pocket #1, folding the edges of the vinyl under 1/4" and sewing 1/8 inch seam on both the right and the left side. You can also fold up the bottom and sew the same seam, or leave it open like I did because it will be finished when you sew the wallet inside to the outside.

Sew the vinyl ID pocket on the left side of pocket #1, folding the edges of the vinyl under 1/4" and sewing 1/8 inch seam on both the right and the left side. You can also fold up the bottom and sew the same seam, or leave it open like I did because it will be finished when you sew the wallet inside to the outside.
 Placing right sides of outside and inside together, sew around outside edge, using 1/4 inch seam.
Trim off bottom corners.
 Sew lining (town roads) the same way, with right sides together.
 Turn lining (town roads) right side out and tuck inside the wallet that is still wrong side out. Sew 1/4 inch seam around the top edge, leaving a 2 1/2" opening to turn right side out.


 Sew lining (town roads) the same way, with right sides together.
 Turn lining (town roads) right side out and tuck inside the wallet that is still wrong side out. Sew 1/4 inch seam around the top edge, leaving a 2 1/2" opening to turn right side out.
Turn right side out, poke corners out so they are square, tuck lining inside and sew 1/8 inch top seam around top, closing the gap you left open to turn the wallet.
TA DA!!!

Now make a personalized "drivers license for your little one. :)
 Fill it with all those cards you get in the mail!
 Fill it with all those cards you get in the mail!
Maybe some money... and wrap it up... or just watch your little one's face light up when you show them! ... it makes it all worth it!
Click on the tutorials tab at the top of the page to see more projects like these!


This is awesome! So cute and practical!
ReplyDeleteNeat. They look really nice.
ReplyDeleteThis is so cute! I love all of those pockets!! I linked to your tutorial over at Craft Gossip Sewing:
ReplyDeletehttp://sewing.craftgossip.com/tutorial-childs-wallet-with-plenty-of-pockets/2010/12/07/
--Anne
my nephew has been wanting a superhero wallet and I have some superman fabric so I'll definitely have to give this a try for him...thank you!!!
ReplyDeleteI really like your tutorial. I like how the pictures are step by step. Great job with those! I might have to borrow your tutorial to make my kids some wallets!
ReplyDeleteHello! I found you over at Someday Crafts. Thanks so much for sharing this awesome tutorial! I'm a new follower. :O)
ReplyDelete~ www.billiemonster.com ~
Hi, i'm your 101 followers...
ReplyDeletecame across your site from craft gossip...
thank you so much for sharing this great tutorial...
~Happy Crafting~ Sharing is Caring.... <3
This is just what I was looking for for my kiddos. Thanks so much for sharing this tutorial.
ReplyDeleteThanks for sharing! I made a blue one for my 7 year old and he loves it! It's not as sturdy as yours or as colorful, but he likes it so that's all that matters!! I'm going to attempt to put it on my blog now at http://craftingfrommyheart.blogspot.com/
ReplyDeleteMade one for my son and he loves it! Thanks for sharing! See his here, https://www.facebook.com/photo.php?fbid=744923895570850&set=a.160591617337417.41653.160585690671343&type=1&theater
ReplyDeleteI plan to make this one for ME to keep in my pocket while traveling!
ReplyDelete